:Get the look: Retro Glam
It’s that time again!
Time to Tame your Shrew (… this is starting to sound weird), but I’m serious! Today I’m doing a Retro edition. The VMAs and the elegant simple hair influenced by films such as The Great Gatsby and shows like Mad Men really showed the simple beauty of another era.
The Finger Wave Faux Bob.

I love the classic elegance of waves. They’ve gained popularity from Taylor Swift, even the most recently at the VMAs. What I’ve done today is I’ve paired it with a faux-bob technique that works on any hair length! It’s a fun way to freak your friends out and also just to try something fresh and different.
It goes a little something like this:
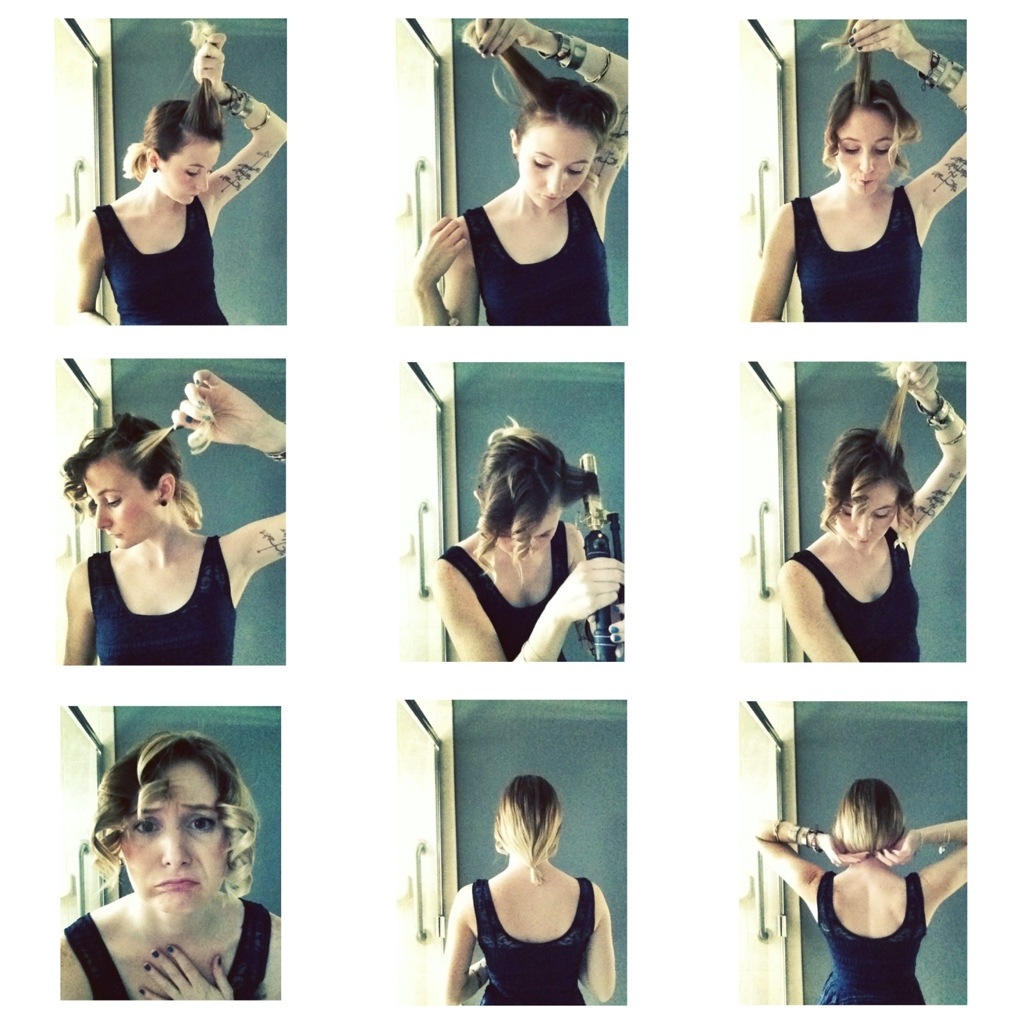
. Take a horseshoe section from the corner of brow to corner of brow. The size of this section is going to depend on the thickness of your hair.
. All of the hair outside of the horseshoe, pull back away from your face.
. Take horizontal sections that are as wide or a little wider than your finger.
. Insert the curling iron horizontally and work your way up your head. Don’t disrupt the curls once you pull them out. You can even pin them if you want it to be tighter.
. Work this whole section this way.
. While the curls are cooling, pull all of the hair left out of the horseshoe and create a very low pony tail, as low as possible.
. Roll and tuck this ponytail up underneath itself, along your neck.
. Depending on how long your hair is and how long the layers are around your face, this will look differently on everyone! I already have a bob, so now my faux bob is super short.
. Come back to the front section now and, using a boar bristle brush (because it will give you the maximum softness and airiness to your wave, brush through your waves, combining them and helping them all move in the same direction. As you brush it out you will start to see your S pattern form and you can then start pinching and spraying to enhance that pattern.
. You’re going to have a transitional space between your bob and your waves, I like this look, but if you want it to be more blended through then you can pull a little bit of hair out of the bob and wave in a similar way to the front.

Ta da!
The smaller the iron and sections, the tighter the wave pattern.
Experiment, play and have fun with it!
The Victory Pin Up.

Think 50’s housewife, but this retro glam style is never out of date and if you use more current patterned scarfs or headbands then you can make it as modern or as old school as your heart desires.

. Take a small horseshoe at the front of your hair, if you have short fringes then be sure to pull enough hair from far back on your head to compensate for that and add the length that this roll needs.
. If you would like, backcomb this section to add height, then wrap the very ends around your fingers and thumb and use it to work and roll the section underneath. Once you work it back, pin it. I like mine to be a little bit slanted, I think it adds for good drama (and it helps to break up my square lined forehead).
. Pin your remaining hair back in whatever fashion you’d like. I did mine kind of messy and criss-crossed.
. Take your bandana/scarf… whatever… and tie it around your head, You can adjust the back of it to show off your pinning or cover it up- however you’re feeling.

——
There you guys have it!
I can’t wait to see and hear how everything went with these styles! Your twists on them, your personal touches. Please send me photos, stories, hate mail, whatever you want!
I’m here for you guys.
Cheers to having great hair that is timeless.
xoxo,
Sara
P.S.
A little fan mail and a little showing off of skills from the last edition of Tame of the Shrew. You guys do it better than me! 😀

